Dizzy Miss Lizzi

Dizzy Miss Lizzi
Sunday, July 31, 2011

Playing with water nail decals

Hello everyone ^_^/

Today I have a really fun post for you. I will show how you can create some easy nail art by using water nail decals. I will be using some of the nail decals I got from the Born Pretty store a while ago.


As I have never tried these before I was a bit worried about how they would turn out so I asked my mum to help as a volunteer. She wanted roses on a light background. We used Revlon's Sunshine Sparkle as the base colour. After applying two coats we waited for the polish to dry completely before moving on.


Application was much easier than expected. After cutting each nail decal, we submerged them into water for a bit and then applied on each finger. Tapping a bit to remove the excess water, each nail decal was firmly set.


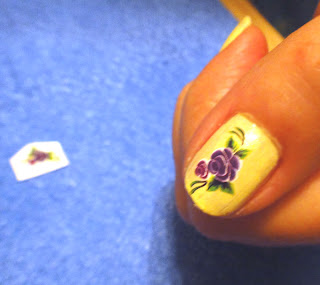
Sealed everything with top coat and the manicure was ready!


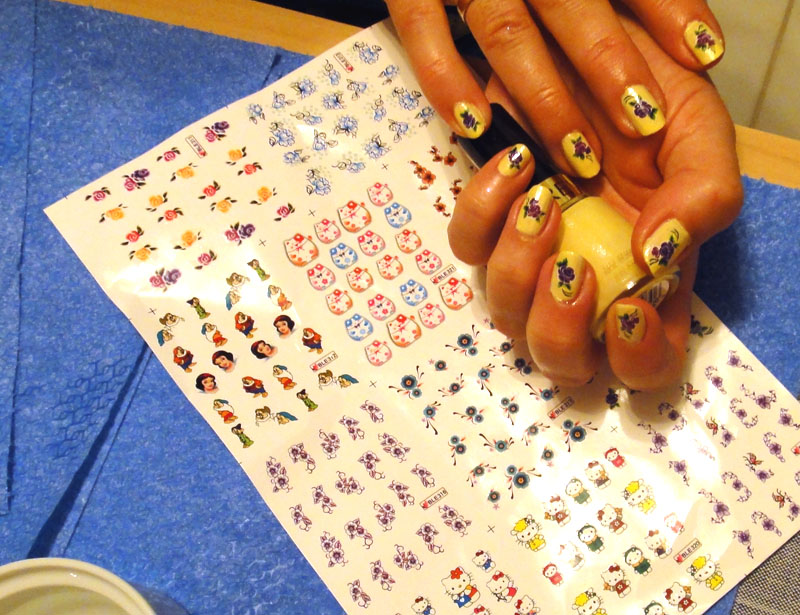
It was so much fun that my mum wanted to try it too, so she applied a few on my Ulterior Motive manicure that I was already wearing for a few days.


I think the pink and blue kitties go really well with this colour ^_^

Here are our finished manicures.


Have you ever tried water nail decals? This was my first time but I will definitely use them more now that I saw how easy they are to apply. If you would like to get the ones pictured on this post, you can head at Born Pretty.

These nail decals were provided to me by Born Pretty for reviewing purposes.

You have read this article nail art / Revlon / tutorial / yellow with the title July 2011. You can bookmark this page URL https://dizzymisslizzi6.blogspot.com/2011/07/playing-with-water-nail-decals.html. Thanks!
Thursday, July 28, 2011

Color Club Ulterior Motive

Hello everyone ^_^

today I want to show you a spectacular nail polish! Ulterior Motive from the Alter Ego collection by Color Club.


It's a fuchsia nail polish with lots of teal and pink glitter in it.

As I feared it might be transparent I used two coats of Catrice Wrapped Around my Finger as a base.


Then I applied two coats of Ulterior Motive and a coat of Seche Vite to seal my manicure.
These two nail polishes are similar but Wrapped around my Finger has a more subdued effect while Ulterior Motive is full on sparkle on your nails!


At first I intended to do some nail stamping but this nail polish is too pretty to hide so I decided to leave it as is. I just couldn't stop staring at my nails while wearing this. I think it has become my favourite colour for this season. Especially under the sun when you can see the sparkly effect in all it's glory!

If you haven't tried this colour yet, I totally recommend it ^_^
You have read this article Catrice / color club / nail swatches / pink with the title July 2011. You can bookmark this page URL https://dizzymisslizzi6.blogspot.com/2011/07/color-club-ulterior-motive.html. Thanks!
Monday, July 25, 2011

Let's celebrate summer, a review and a giveaway!

Hello everyone ^_^/

I hope you are all having a nice day and that this post will make it nicer as today I have for you a review and a giveaway!


Recently I have come to know the lovely Peggy that runs the Jewels by Peggy blog. She is a fellow crafter and makes really lovely jewellery so when she asked me to review some of her creations I couldn't say no.


She was kind enough to send me two pretty starfish and beads necklaces in brass tones. They are very pretty and perfect to wear for the summer be it the beach or a club you're going to. Here you can see me wearing the blue necklace. If you want more information on her creations you can check her blog or contact her on facebook.


So here is the deal. I get to keep one of these beauties and the other one will go to one of you, my dear followers ^_^ I chose the blue one so the brown is up for grabs.

And as I want to keep to the theme of my blog I also added one of my nail polish jewellery designed to match this lovely necklace. It is a lovely nail polish ring with chunky colour changing glitter.


You have read this article giveaway / review with the title July 2011. You can bookmark this page URL https://dizzymisslizzi6.blogspot.com/2011/07/let-celebrate-summer-review-and-giveaway.html. Thanks!
Saturday, July 23, 2011

Ozotic Pro 506, a multichrome party!

Hello everyone ^_^/

As promised in my previous post, today I will show you one of the fabulous Ozotic Pro multichromatic nail polishes in an actual manicure. I chose number 506, which has hints of blue, pink and purple.


For my base I used Orly Royal Navy and Zoya Jacy. I wanted to see if the base coat makes any difference or not so I applied two coats of each over base coat as you can see in the pictures below.


Both colours are very pretty and vibrant and I could just keep my nails like that for a few days but at the time I was itching to test the Ozotic goodness.

I applied two coats of Ozotic Pro #506 and then a coat of Seche Vite topcoat to seal everything.


There are no words to describe how pretty this nail polish is. Depending on how I moved my nails, all my favourite colours would appear. Purple, blue and pink being the most dominant on my nails. Also I want to note that the base colour made no difference afterwards. On all my nails I saw the same colours.

I took my nails to the beach as well so here is a bonus shot ^_^


I had this mani on for a good 7 days before removing it and even at the 7th day it looked as good as new. It was with a heavy heart that I removed it to move on to the next one.

If you ever want to treat your nails to a unique nail colour, I highly recommend this one. It is of great quality and the end result is amazing and will definitely attract attention to your nails!

On information where to buy this beauty check my Ozotic haul post.
You have read this article multichrome / Orly / Ozotic Pro / Zoya with the title July 2011. You can bookmark this page URL https://dizzymisslizzi6.blogspot.com/2011/07/ozotic-pro-506-multichrome-party.html. Thanks!
Thursday, July 21, 2011

Ozotic Pro mini haul and swatches

Hello everyone ^_^/

Today I want to share with you a very special nail polish brand from Australia, Ozotic Pro.


Ever since my dear 'Chelle sent me my first Ozotic Pro nail polish I fell in love with this brand.
Recently I found out it could be pruchased internationally via Picture Polish so I decided it was time for a  mini haul. After careful consideration I decided on Galaxy, Elytra 528, Eclipse and Reef (as seen from left to right).


The ladies at Picture Polish were very helpful and within two weeks these lovelies were sitting on my workbench ^_^

No photo can really capture the beauty of these nail polishes but I tried my best.


I did a few swatches on a nail wheel under direct sunlight.
Galaxy, which is a black holo, is two coats, while the other colours are layered over a coat of Galaxy. No topcoat was used. The colours from left to right are as mentioned above.


What do you think? Do you own any Ozotic pro nail polishes?
Even though they are a bit pricey I think they are well worth it. In my next post I will show you my first mani with one of these beauties ^_^
You have read this article glitter / holographic / multichrome / nail swatches / Ozotic Pro with the title July 2011. You can bookmark this page URL https://dizzymisslizzi6.blogspot.com/2011/07/ozotic-pro-mini-haul-and-swatches.html. Thanks!
Monday, July 18, 2011

Purple stars manicure

Hello everyone ^_^/

today I have a starry manicure to show you. As you might or might not know, I love stars.
And purple.
And glitter.

So I wanted to do a manicure combining all of the above.


I decided to use some of the polishes from my recent swap with Stephanie, so I picked two of the Hema polishes, a purple and a silver glitter. I also used some silver star nail stickers that I got from Japan last year ^_^


After applying my base coat, I painted two coats of the purple Hema polish. As you can see it probably needed a third coat to get full coverage but as I had other plans for this mani, two were enough.


Afterwards I sponged glitter on the tips of my nails and applied the nail stickers. Sealed everything with the fabulous Better Than Gel Nails top coat from Essence and the look was finished. I highly recommend this top coat, if you want a cheaper alternative to Seche Vite. It's almost as good and I am loving it so far!


Please do not mind my silly middle finger, it keeps breaking lately and no matter what I do it just won't grow. But I won't let it bug me, no XD
You have read this article Essence / glitter / Hema / nail art / purple with the title July 2011. You can bookmark this page URL https://dizzymisslizzi6.blogspot.com/2011/07/purple-stars-manicure.html. Thanks!
Saturday, July 16, 2011

London nail polish haul swatches

Hello everyone ^_^/

gah, I cannot believe it's been a week since my last post. I blame the heat for this.
It's so hot that I feel like a chicken most of the time. September just cannot come soon enough X____X

This is a post I've been meaning to make for a while since I saw some of you were interested in the polishes I picked up from London. So I swatched them all on a nail wheel. All swatches are two coats each without topcoat.

From left to right the nail polishes are:
Model's Own Smash Up in Pink and Purple (layered over BarryM grey), GOSH Purple Heart, Accessorrize Pink Spice, Aztec, Notorious, Revlon Sunshine Sparkle and Blue Lagoon, BarryM Grey, Raspberry and Vivid Purple and finally a grey glitter and a pink shimmer from Claire's.


I hope you enjoy these while I go sit under the a/c to feel human again XD
You have read this article Accessorize / barryM / Claire's / Gosh / Models Own / nail swatches / Revlon with the title July 2011. You can bookmark this page URL https://dizzymisslizzi6.blogspot.com/2011/07/london-nail-polish-haul-swatches.html. Thanks!
Saturday, July 9, 2011

Let's deco, decoden tutorial #2

Hello everyone ^_^/

this is a post I have been preparing for some time now. I will show you a basic deco tutorial.
Recently I got a new camera and of course I had to bling it up. I took detailed photos of the process to show you here.

First let's see what you will need.


Crystals. In this case I used Swarovski crystals but if you want to opt for something cheaper there are many choices like the rhinestones that we use for nail art.
Deco glue. Most crafting glues will do for this.
Deco parts. I used a diamante skull and a diamante butterfly.
Clear laquer. (optional)
Tweezers.
Some toothpicks.
And most importantly an item to decorate, a deco base so to speak XD

Now before you start I advise you to think carefully and decide on the design you want to make. Then place the parts roughly on the item to see how the final piece will look like. For my camera I decided to do a pink gradation design with a skull and a butterfly as accent pieces.

Before anything else clear the area with some acetone.
Then apply the clear laquer according to the instructions. (this is really an optional step only if you might want to change the deco later. I do not recommend it if you want to decorate say a phone case or a mirror etc.)

First place your accent pieces (in this case the skull and butterfly).


After that you start placing the crystals. Place glue in a small area and cover it. That keeps the glue from drying and destroying your design. If at some point you place extra glue you can use a toothpick to clean it. What I find easier is to start from the edges and move inwards.


Move in a steady pace and cover all the spots using various crystal sizes.


And here you go, the finished product!


When you are done you can attach a few matching phone straps to make your item even cuter!


Many of you asked where you can get deco supplies. They are very easy to find.
I get some of them locally at craft stores or even 1 euro stores but you can also find them on ebay.
There are many different shops there if you do a search and you can find all sorts of cute items to use.
Your imagination is the only limit :)

Also a word of advice. Decoden is an expensive and high maintenance hobby. It looks very cute but there is always the chance that some of the crystals or parts will fall off, no matter how strong a glue you use. So you must handle your deco items with care and know that most probably they won't last forever.

And here I will close this tutorial. If there is anything I missed or you have any questions leave a comment or shoot me an email. It might take me a while to reply as I am quite busy these days but I definitely will.
You have read this article bling / deco / deco tutorial / decoden / swarovski / tutorial with the title July 2011. You can bookmark this page URL https://dizzymisslizzi6.blogspot.com/2011/07/let-deco-decoden-tutorial-2.html. Thanks!
Sunday, July 3, 2011

We have the winners, yay!!!

Hello everyone ^_^/

after a lot of checking and verifying entries I finally have the winners of my 1st blog birthday giveaway yay!!!

First of all I would like to say thank you to everyone who entered, I was amazed as there were 420 entrants!
I hope you will stick around now that the giveaway is over too :)
It was so heartwarming reading your kind messages and suggestions, I will keep everything I read in mind!

So let's move on to the announcement of the winners!

・:*:・゚★,。・:*:・゚☆・:*:・゚★,。・:*:・゚☆・:*:・゚★,。・:*:・゚☆

*The winner of the first prize is I'm feeling nail-venturous
*The winner of the second prize is Forever 1992
*The winner of the third prize is Wackylaki

Also since while the giveaway was going on I passed 1000 followers there is a surprise prize for a special winner who is Kayono

・:*:・゚★,。・:*:・゚☆・:*:・゚★,。・:*:・゚☆・:*:・゚★,。・:*:・゚☆

Congratulations to all the winners!!!
I have emailed all of you. Please get back to me within 48 hours, or I will have to choose another winner in your place.

For all those who didn't win, better luck next time :)
You have read this article giveaway with the title July 2011. You can bookmark this page URL https://dizzymisslizzi6.blogspot.com/2011/07/we-have-winners-yay.html. Thanks!
Friday, July 1, 2011

Nail looks for July

Hello everyone ^_^/

Today is the first day of July and I know that usually I posted the nail calendar.
Unfortunately Nail Up! never published the rest of it :(

So I decided, to keep up with the "tradition" so to say, to scan parts of the nail mags I have and post some Japanese nail art with tutorials.
I hope you like this idea. If you have any other suggestion please let me know :)

For July I chose two looks from the summer 2011 issue of Nail Venus.
Since 4th of July is approaching I went for two looks inspired from America (according to the magazine at least).

The first one is a Splatter Peacock nail art look.


According to the magazine splatter peacock gives the sense of graffiti art. This type of nail art gives the feeling of street style. The point is that the colours must not overlap too much. Summer is all about mixing opposite colours for a flashy effect.

So how do you achieve this look?
First paint the nail with the white base colour properly with 2 coats. Then paint roughly the blue and pink to create graffitti effect.
Using yellow and red, paint on top of what you see on step one making sure to leave a bit of white uncovered. Paint in a splatter style effect.
Finally using a fine brush (or a toothpick) drag the colours gently to one direction to create a peacock effect. Finish off with top coat.

The second look is a pastel colour look with golden studs.


The main focus of this look is the colours. Using studs you can emphasize the curves and give the manicure an artistic look.

First paint the nails with two coats of the black base colour. Wait for it to dry completelly.
Starting from the base of the nail paint a curve from the side. Make sure you paint two coats so the black won't show.
Then starting from the edge of the nail towards where the green ends make another curve (again 2 coats) and last put the studs.

That's it for this time's new looks. What do you think of this idea? Would you like me to continue doing this or do you have another suggestion? Let me know :)

p.s. the winners of my giveaway will be announced sometime in the weekend. I am still verifying the entries.
p.s.2 you can click on the pics to make them larger :)


You have read this article Japanese style nails / nail art / nail inspiration / scans / tutorial with the title July 2011. You can bookmark this page URL https://dizzymisslizzi6.blogspot.com/2011/07/nail-looks-for-july.html. Thanks!